Rear Wheel Bearing on a 94

We may earn a small commission from affiliate links and paid advertisements. Terms

flyingsolo

New Member
Ok so I got a 94 Accord and it sounds like the right rear wheel bearing is going. how difficult or expensive will it be to replace that generally speaking?
 
Ok so I got a 94 Accord and it sounds like the right rear wheel bearing is going. how difficult or expensive will it be to replace that generally speaking?

Piece of cake. You need a 1/2 drive breaker bar or ratchet and a large socket, can't remember the size now but Honda could tell you if you called a dealer and asked for the service department. So you take the wheel off, then use a chisel and hammer to pret that gold cap in the center off, its just a dust cover. Now you can see a nut that has been hammered in in one place. You MUST hammer that back out with a punch or some sort of small screwdriver, anything you can hammer in there to try to wedge it back out, but be extra careful not to break whatever you use off- or your job will get 10 times harder. Alright so one you are ready to loosen that nut, use the huge socket and rathet/breaker bar (and a pipe over it if you're small like me) and loosen it. Once you do, you will be able to slide the bearing right off if it is an EX, and if it is an LX with drum brakes you will need a snap ring spreader to get that clip ring off. Oh I forgot to mention you will have to take the caliper and rotor off if you have an EX and if it is an LX just take the drum off. Either way, the job is more about having the right tools than knowing how, its a very simple simple job. But for both you're talking a big ass breaker bar and socket, then for an EX you need an impact screwdriver to get the rotor off ($10 at auto zone) or a snap ring spreader if it is an LX. If its an EX, and you get those screws out of the rotor, cover them heavily with anti seize while you're at it. You will thank yourself the next time you have to do your rotors. Also the back caliper slides are notorious for rusting/gunking up, clean and lubricate the caliper slides while you're at it.

If you need more specific instructions post again, and I have a rear wheel bearing for one of those if you're on a tight budget, I'd take $35 bucks for it shipped which is better than $80 at auto zone but you should put a new one on if you can afford it.
 
How time intensive is this usually? And its an EX that has the problem, although I have both the EX and the LX. I am wanting to do the change on it myself, so more specific instructions would be awesome since I am still somewhat new at doing car repair. Let me check around and see if my friend that told me the bearing was going can get me a deal on a bearing, otherwise I will let you know about the one you mentioned. I appreciate it. Thank you for the help with this.
 
Alright, on that car, ground up, here we go. You will need a 12mm end wrench, 14mm end wrench, a small sledge hammer (something like 4lbs is good), an impact screwdriver (Auto Zone sells them as I mentioned), a jack (and then use your car jack from the trunk as a safety jack), a small flat chisel/punch or a couple of small flat blade screwdrivers, 1/2 inch drive breaker bar, 24 or 22mm socket (honda lists both, so I cant tell if they used both sizes or what), and of course your new bearing.

1) Break the lug nuts loose while the car is on the ground

2) jack up the car until the tire is off the ground and secure it with a safety jack. You want to be lifting the car by the pinchweld which looks esactly like it sounds- the long seam running front to back, there are even arrows pointing to it molded into the plastic rocker panels.

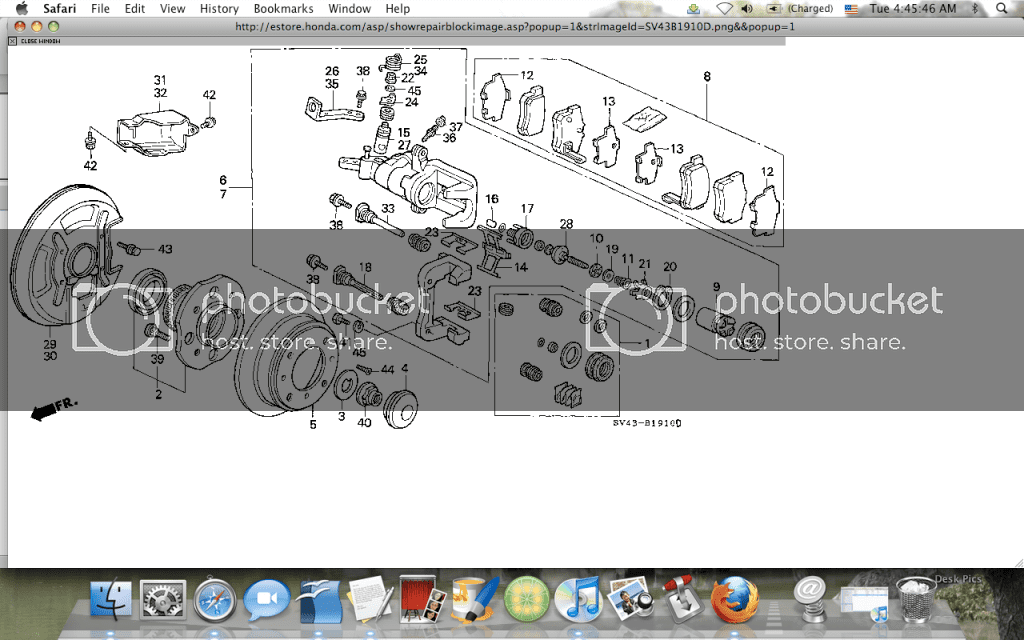
3) finish loosening the lug nuts and remove the rear wheel. Next, take the two 12mm bolts out of the brake caliper. Lay the caliper aside.

4) Remove the 2 caliper bracket bolts using a 14mm wrench. By the way, you can tap a wrench with the hammer to break bolts loose, it generally wont hurt the wrench, just be damn sure you're turning counterclockwise to loosen.

5) Take the impact screwdriver and make sure its in reverse. Set it into the two phillips screws in the brake rotor and tap with a hammer- by tap I mean hit really effing hard. If you get the two screws out without stripping them, slide the brake rotor off and lay it aside. If you strip the screw heads or break off the tip of your phillips bit, you will learn a new skill called drilling hardened metal. Use a drill with a half inch or so bit and drill the head of the bolt out. Its a pain but I've done it a lot and it can be done.

6) Use a chisel and the hammer to pry back that gold cap in the center of the bearing. Wood chisels work best for this.

7) Now you can see the giant 22mm or 24mm nut that is "staked" or has been hammered in in one place to secure it. As I stated, use the hammer and a chisel or small screwdriver to unstake it-you're trying to make it round again. Once you do this, but the huge breaker bar and socket on there and wrench it off. Now you can slide the bearing/hub assembly straight out.

8) slide the new bearing on, and make sure you put the washer on before reinstalling the nut.

9) Putting it back together is the reverse of this. Tips for reassembly-

10) Use sil glide or synthetic grease to lubricate all nuts and bolts- if you have to work on it in the future this prevents things from rusting and being an overall pain in the dick later. Particularly grease those little screws that hold the rotor on- and dont tighten them very tight, just get them as tight as you can with a regular phillips screwdriver, don't use the impact to put them on.

11) Pull the slide pins out of the brake caliper bracket (the part the pads rest in) and wipe off the old grease, replacing it with new grease. Don't use too much or or you will again have a problem, but it is critical you check on your brakes while you're in there. If they won't move in our out (it's the parts with the rubber boot around them that the caliper bolts onto) the you will have to force them out. Get a bore cleaner brush if they are seized so you can clean the holes out once you get the pins out. Use sandpaper to buff the old pins up until they shine.

12) If your brake pads or rotor look shot, replace them.

13) Don't over tighten the nut, just put it back on in the position that it was.

That's the simple version, if it gets terribly tricky post any questions and I'll try to respond.
 
Picture6.png


Those pins are number 33 and 18 in the picture- you definitely want those moving freely or you will end up with severely uneven brake wear in the rear and possibly warped rotors or brakes that aren't squeezing at all. They are overlooked on nearly every accord I get ahold of- hell, preludes too.
 
Ok awesome. Thanks for the help and the diagram. That will help a lot. I don't have one now, but would you recommend getting a floor jack instead of using the scissors jack thats in the car?
 
For time involved, I can do one in a half hour or so but your first time could take a couple of hours if you run into problems.

For the Jack, yeah, considering how hard you'll be torquing on that hub nut I would definitely get your hands on the best jack you possibly can. Even those little red $30 jacks from auto zone are worlds better than the scissor jack. And if you aren't using a safety stand with the jack you use, use the scissor jack as a safety jack. Even then, try not to put anything under the car you don't plan on getting back. Oh and don't set the E brake- it engaged the rear brakes only and you'd never get them apart. If it is a manual throw it in gear, or if its an auto leave it in park. Safety is #1.
 
Yeah safety is the number one concern of mine while working on anything.

I will probably get a floor jack and a set of jack stands then. Just to be safe and not risk killing myself or anything that might be under the car.
 
Back
Top