Hey all! I'm new ot the board... my roomate is a member here, and told me a while back about the board, and that i should check it out... well, we just got done with a project at my shop, and thought it'd be a nice time to sign up, introduce myself, and also show you guys what we've been working on ") It is sort of in a diary format... i've just been adding to it when i can. Sooner or later i'll get this posted up on my site, which is why i'm writring it liek this, but for now, forums it is!
It is sort of in a diary format... i've just been adding to it when i can. Sooner or later i'll get this posted up on my site, which is why i'm writring it liek this, but for now, forums it is!
Oh, also, i WAS going to post this in tech, but i was reading the rules, and it wasn't really -asking- a tech question...If there is a more appropriate forum, and a mod would like to move it, please do, and i'm sorry if this is in the wrong area!
-----------------------------------
A K20R CRX is born....
This is my first foray into a K-series CRX swap, so i'm learning step-by-step, and believe me, there is a ton of little things that need to be dealt with on this swap. First and foremost, like any swap, make sure all the parts are there before you start... with the K stuff, since some of it is still 'custom' with manufacturers, sometimes getting the parts you need in a timely manner isn't all that easy. lol.
Anyway, so here is what we are starting with... a baby-crap green CRX, with a fairly healthy GSR swap already in it. The motor has 13:1 compression, RMF header, and a hogged out intake manifold. The car is running a ZDyne GOLD for tuning, and really is a fun little car to drive.... but he wants more


The new hotness... a JDM K20A Type-R

First order of business was to completely remove the old engine, and strip the engine bay. The owner of the car is wanting to repaint the car a very nice Hunter Green in the future, and so while we have everything out right now, we're going to completely redo the engine bay for him, and that way he won't have to mess with it when it is time to redo the rest of the car.

With everything out, we also decided to remove any unnecessary bracketry, and cover up any unecessary holes in the engine bay... sorto f a 'mild engine bay shave', without a complete wire-tuck. Also, we started installing the timing chain-side bracket that is supplied in the HASport Mount Kit we are using. The instructions say that you just have to weld the rosette welds, but we went ahead and welded al the way around. Better safe than sorry... besides, once painted, the weld is easier to make look nice than a big gap between the mount and framerail.


The job also requires "banging in the rear crossmember for clearance"... so instead of sledging away at the car, we notched the rear crossmember, folded the edges into each other, and seam-welded it back together. Came out fairly nice

And here is the engine bay right before it left for paint

While the car was at the body shop, we had them completely remove all of the stock seam sealer, and refinish the car with all new sealer. They completely sanded it down, and repainted it with base-coat and clear-coat in a beautiful black finish. Unfortunately this makes pictures tough to take, because light won't reflect off of it very well, but it'll look beautiful with the Hunter Green paint job when it gets done.
Now we're going to skip ahead a bit, because unfortunately the memory card that was being used sort of crashed for some reason, and we haven't been able to get the pics off of it
So now the motor is in the car. Everything pretty much lines up perfectly, and if you have a lift, the car slides right over the motor with absolutely no isses at all. Fits easier than a B practically... lol!


Couple of things noticed at this point: Make sure your belts are on before the motor goes into the car. It is a lot easier to figure out the routing. Also, make sure you have the alternator relocated somehow, or the headlight bucket modified. I didn't like the idea of cutting the fresh new engine bay headlight housing, so we relocated the alternator.


Also, it is kinda hard to see in this pic, but make SURE that you have everything done to this motor before you put it into the car... because to pull the head on this motor, or mess with anything under the timing chain cover, basically will mean pulling the motor. The area between the shock tower and the timing chain cover is extremely close. At minimum here, you'll have set the motor on a dolly, unhook all the mounts, pull it forward 1.5" or so, and then shift it over another couple of inches to be able to clear the car... you can then leave a lot hooked up this way, but it is a LOT of extra work just to pull the head, or replace a timing chain.

The Header being used is a DTR Fab 4-1 Merge Collector Header. This is a very nice piece... it sure is a tight fit though. To pull the header, the engine has to come out of the car basically (or at least completely unhooked, and pulled forward a couple of inches).


Also installed, is a full Ingalls Camber Kit. Using Balljoints in the front, and the forged adjustable link for the rear, this car will have great camber, and be really easy to align. <<Shameless Plug>> If you'd like to purchase a set for your car, check out www.IngallsCamberKits.com

During the process, the prop valve was also replaced, and new brake lines added. While we had them out, it was fairly easy to modify them, but you can see how the prop valve was mounted here... fairly simple, and definitely out of the way.

Next item up for change, is the shifter box area. It was decided that the car should look stock from the inside, so we trimmed out the center console area, and boxed it in with steel. Created a new floor for the shifter, and now the shifter will have a place to go, and fit completely underneath the stock console plastic.


Also on the 'modification list', is the radiator. The aluminum radiator in the car would barely fit, even moved all the way over to one side. The upper hose was still coming out right at the throttle body. So, instead of off-setting it, we decided it'd be better to just center it, and reposition the top hose position. So, i cut, welded, and voila! Also, we decided that for the cleaner look, it'd be cool to mount the radiator using its lower mounting holes... so now it is in place, and barely moves with no upper braces... looks a LOT better.


Here is the car as it sat waiting for a fuel rail to complete the system...


Can't wait to get it finished... this has been a fun but tedious swap. Its taking forever, but it'll be worth it. Definitely need to be ready for almost anything when doing this swap... and unless you have good fabrication abilities, and a welder, you'd be hard-pressed to do this properly in your driveway (so shops rejoice! you'll probably have more swap customers with this swap than with B's in the future )
Anyway, i'll update this once we get it to a track. The motor is completely stock, except for the custom intake tube, and the 4-1 header/2.5" full mandrel bent exhaust i'm putting on it tomorrow.
Fastforward a few days... hehe
Well, she runs! Fired up for the first time tonight. Although, still have not gotten the fuel rail we've been waiting for...GRRR! How freakin hard can it be to get a fuel rail, even overnighting it? Doesn't matter, we improvised... and actually, i personally like it better!
Now for the pics... first things first, i was sent a set of these fender braces by Robert at RC Auto Works. I requested them unwelded, because i wanted them TIG welded, and he's not offering them TIG'd (Yet )... So anyway, he sent htem to me in no time, all tack welded together, and i just had to finish weld them. Not bad pieces Fitment was great, and all the mounting flanges and hardware were right-on.


They went onto the car, and we snapped some shots.


I promised Robert that i'd get good pics of them, and since it is a black background, i had to paint them silver... unfortunately, he sent me silver stickers! LoL.... Well, almost all silver


He sent one Pink sticker, so it got put onto the braces for the pics Thanks Robert for the fender braces! They found a great home!
Next order of business was touching up a few items. We got kinda concerned about the radiator and the intake manifold, so our tech Jason decided to install a rubber foot incase they decided to rub, it would insulate it... worked great!

Then the interior got put back together.... this is why the shifter box welding was done... so that the center console could fit over the rsx shifter box, and everything would clear nicely!


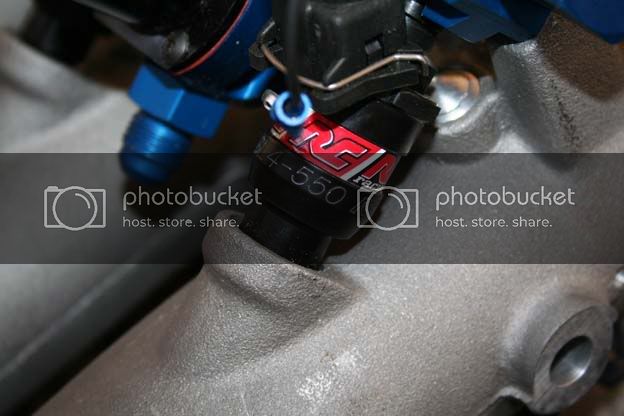
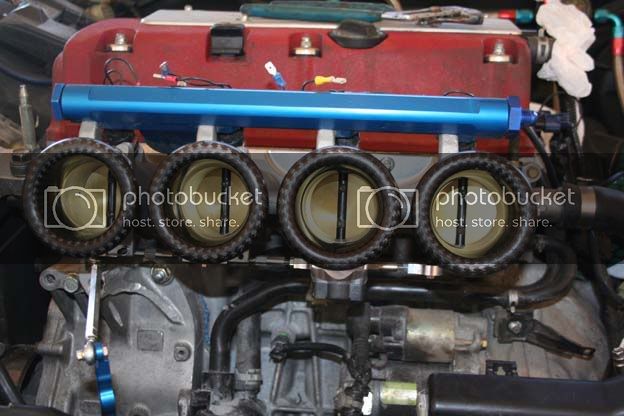
Now, onward to the fuel system! So, we ordered a GE fuel rail on Thursday (It is now Monday) through our local wholesale supplier, and it was SUPPOSED to be overnighted... Well, someone dropped the ball, and it is still unaccounted for. So, we just improvised... the stock fuel rail is steel, and i had some steel fittings.... so that was that:

For the rest of the fuel system, we used an Aeromotive -6 FPR, mounted it on the firewall to existing bolt holes, and plumbed it all up...


Anyway, thats that, she runs, and all is well. Putting the finishing touches up on the exhaust system, and it'll be at the track for some runs very shortly
I do have a vid from the first-startup, and will post it once i get it off of my friends phone.. hehe.
For now, THANKS for all the AWESOME responses and questions. It was nice talking to those of you interested in the swap. We have two more K-RX swaps coming in right behind this one... one built K24 setup which should be out of this world awesome!, and the next one (which will be built right beside it basically) is going to be a turbocharged K20, likely running Motec (already have it, but may try K-Pro first), GT42 turbo, and a couple of other interesting little tricks up its sleeve
Also, both of the upcoming cars are going to be full-restorations as well, which means they will both be getting new paint jobs! So like this one got its engine bay done, the next two are getting the whole car and the engine bays done. The next few months are going to be VERY fun!


It is sort of in a diary format... i've just been adding to it when i can. Sooner or later i'll get this posted up on my site, which is why i'm writring it liek this, but for now, forums it is!Oh, also, i WAS going to post this in tech, but i was reading the rules, and it wasn't really -asking- a tech question...If there is a more appropriate forum, and a mod would like to move it, please do, and i'm sorry if this is in the wrong area!
-----------------------------------
A K20R CRX is born....
This is my first foray into a K-series CRX swap, so i'm learning step-by-step, and believe me, there is a ton of little things that need to be dealt with on this swap. First and foremost, like any swap, make sure all the parts are there before you start... with the K stuff, since some of it is still 'custom' with manufacturers, sometimes getting the parts you need in a timely manner isn't all that easy. lol.
Anyway, so here is what we are starting with... a baby-crap green CRX, with a fairly healthy GSR swap already in it. The motor has 13:1 compression, RMF header, and a hogged out intake manifold. The car is running a ZDyne GOLD for tuning, and really is a fun little car to drive.... but he wants more
The new hotness... a JDM K20A Type-R
First order of business was to completely remove the old engine, and strip the engine bay. The owner of the car is wanting to repaint the car a very nice Hunter Green in the future, and so while we have everything out right now, we're going to completely redo the engine bay for him, and that way he won't have to mess with it when it is time to redo the rest of the car.
With everything out, we also decided to remove any unnecessary bracketry, and cover up any unecessary holes in the engine bay... sorto f a 'mild engine bay shave', without a complete wire-tuck. Also, we started installing the timing chain-side bracket that is supplied in the HASport Mount Kit we are using. The instructions say that you just have to weld the rosette welds, but we went ahead and welded al the way around. Better safe than sorry... besides, once painted, the weld is easier to make look nice than a big gap between the mount and framerail.
The job also requires "banging in the rear crossmember for clearance"... so instead of sledging away at the car, we notched the rear crossmember, folded the edges into each other, and seam-welded it back together. Came out fairly nice
And here is the engine bay right before it left for paint
While the car was at the body shop, we had them completely remove all of the stock seam sealer, and refinish the car with all new sealer. They completely sanded it down, and repainted it with base-coat and clear-coat in a beautiful black finish. Unfortunately this makes pictures tough to take, because light won't reflect off of it very well, but it'll look beautiful with the Hunter Green paint job when it gets done.
Now we're going to skip ahead a bit, because unfortunately the memory card that was being used sort of crashed for some reason, and we haven't been able to get the pics off of it
So now the motor is in the car. Everything pretty much lines up perfectly, and if you have a lift, the car slides right over the motor with absolutely no isses at all. Fits easier than a B practically... lol!
Couple of things noticed at this point: Make sure your belts are on before the motor goes into the car. It is a lot easier to figure out the routing. Also, make sure you have the alternator relocated somehow, or the headlight bucket modified. I didn't like the idea of cutting the fresh new engine bay headlight housing, so we relocated the alternator.
Also, it is kinda hard to see in this pic, but make SURE that you have everything done to this motor before you put it into the car... because to pull the head on this motor, or mess with anything under the timing chain cover, basically will mean pulling the motor. The area between the shock tower and the timing chain cover is extremely close. At minimum here, you'll have set the motor on a dolly, unhook all the mounts, pull it forward 1.5" or so, and then shift it over another couple of inches to be able to clear the car... you can then leave a lot hooked up this way, but it is a LOT of extra work just to pull the head, or replace a timing chain.
The Header being used is a DTR Fab 4-1 Merge Collector Header. This is a very nice piece... it sure is a tight fit though. To pull the header, the engine has to come out of the car basically (or at least completely unhooked, and pulled forward a couple of inches).
Also installed, is a full Ingalls Camber Kit. Using Balljoints in the front, and the forged adjustable link for the rear, this car will have great camber, and be really easy to align. <<Shameless Plug>> If you'd like to purchase a set for your car, check out www.IngallsCamberKits.com
During the process, the prop valve was also replaced, and new brake lines added. While we had them out, it was fairly easy to modify them, but you can see how the prop valve was mounted here... fairly simple, and definitely out of the way.
Next item up for change, is the shifter box area. It was decided that the car should look stock from the inside, so we trimmed out the center console area, and boxed it in with steel. Created a new floor for the shifter, and now the shifter will have a place to go, and fit completely underneath the stock console plastic.
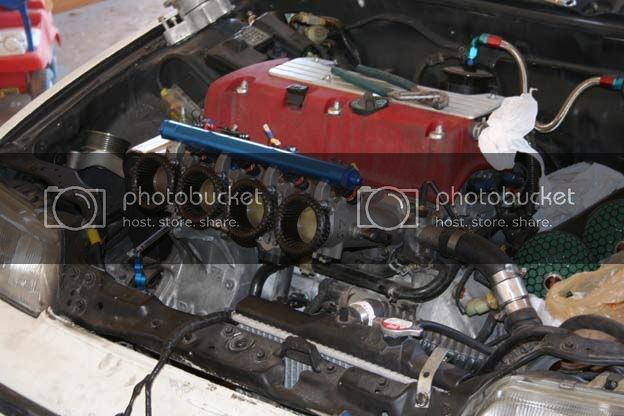
Also on the 'modification list', is the radiator. The aluminum radiator in the car would barely fit, even moved all the way over to one side. The upper hose was still coming out right at the throttle body. So, instead of off-setting it, we decided it'd be better to just center it, and reposition the top hose position. So, i cut, welded, and voila! Also, we decided that for the cleaner look, it'd be cool to mount the radiator using its lower mounting holes... so now it is in place, and barely moves with no upper braces... looks a LOT better.
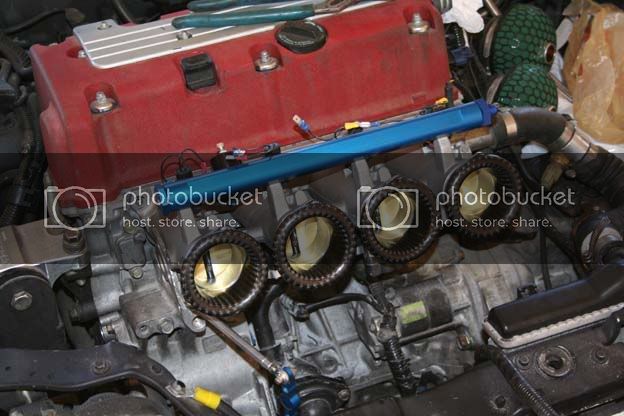
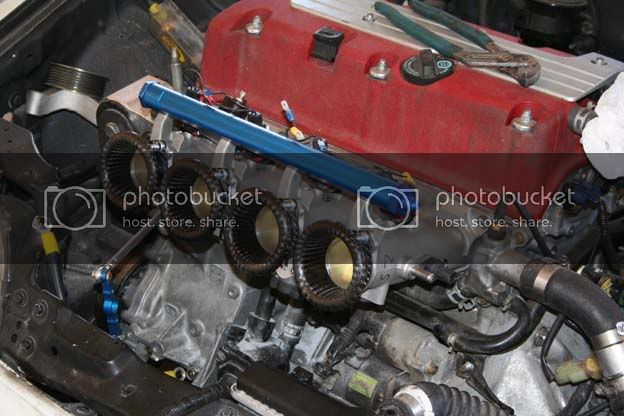
Here is the car as it sat waiting for a fuel rail to complete the system...
Can't wait to get it finished... this has been a fun but tedious swap. Its taking forever, but it'll be worth it. Definitely need to be ready for almost anything when doing this swap... and unless you have good fabrication abilities, and a welder, you'd be hard-pressed to do this properly in your driveway (so shops rejoice! you'll probably have more swap customers with this swap than with B's in the future
Anyway, i'll update this once we get it to a track. The motor is completely stock, except for the custom intake tube, and the 4-1 header/2.5" full mandrel bent exhaust i'm putting on it tomorrow.
Fastforward a few days... hehe
Well, she runs! Fired up for the first time tonight. Although, still have not gotten the fuel rail we've been waiting for...GRRR! How freakin hard can it be to get a fuel rail, even overnighting it? Doesn't matter, we improvised... and actually, i personally like it better!
Now for the pics... first things first, i was sent a set of these fender braces by Robert at RC Auto Works. I requested them unwelded, because i wanted them TIG welded, and he's not offering them TIG'd (Yet
Fitment was great, and all the mounting flanges and hardware were right-on.
They went onto the car, and we snapped some shots.
I promised Robert that i'd get good pics of them, and since it is a black background, i had to paint them silver... unfortunately, he sent me silver stickers! LoL.... Well, almost all silver
He sent one Pink sticker, so it got put onto the braces for the pics
Thanks Robert for the fender braces! They found a great home!Next order of business was touching up a few items. We got kinda concerned about the radiator and the intake manifold, so our tech Jason decided to install a rubber foot incase they decided to rub, it would insulate it... worked great!
Then the interior got put back together.... this is why the shifter box welding was done... so that the center console could fit over the rsx shifter box, and everything would clear nicely!
Now, onward to the fuel system! So, we ordered a GE fuel rail on Thursday (It is now Monday) through our local wholesale supplier, and it was SUPPOSED to be overnighted... Well, someone dropped the ball, and it is still unaccounted for. So, we just improvised... the stock fuel rail is steel, and i had some steel fittings.... so that was that:
For the rest of the fuel system, we used an Aeromotive -6 FPR, mounted it on the firewall to existing bolt holes, and plumbed it all up...
Anyway, thats that, she runs, and all is well. Putting the finishing touches up on the exhaust system, and it'll be at the track for some runs very shortly
I do have a vid from the first-startup, and will post it once i get it off of my friends phone.. hehe.
For now, THANKS for all the AWESOME responses and questions. It was nice talking to those of you interested in the swap. We have two more K-RX swaps coming in right behind this one... one built K24 setup which should be out of this world awesome!, and the next one (which will be built right beside it basically) is going to be a turbocharged K20, likely running Motec (already have it, but may try K-Pro first), GT42 turbo, and a couple of other interesting little tricks up its sleeve
Also, both of the upcoming cars are going to be full-restorations as well, which means they will both be getting new paint jobs! So like this one got its engine bay done, the next two are getting the whole car and the engine bays done. The next few months are going to be VERY fun!

 love your crx! its hot as hell.