Okay, after seeing how messed up my tires looked after the 30.5mm drop from the Tein SS coilovers, I decided it was a good idea to get a camber kit and fix my camber problems.
I went with a Skunk2 front camber kit (which I got new for $175). The kit is very simple. It comes with two adjustable upper arms. The install is simple enough but Skunk2 does not provide any instructions, so I figured now would be the time to write up a how-to article.")
Here we go:
The Skunk2 camber kit
[attachmentid=44]
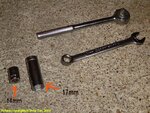
you'll need these tools
[attachmentid=45]
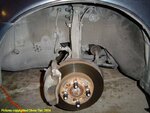
First, jack up the car and take the wheel off. I started on the driver's side (left) first.
[attachmentid=46]
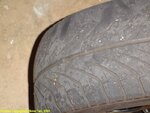
Look at the tread... ouch
[attachmentid=47]
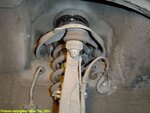
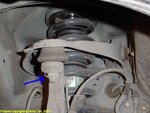
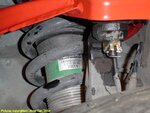
A couple pics of the OE upper arm.
[attachmentid=48]
[attachmentid=49]
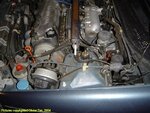
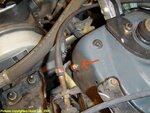
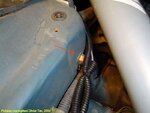
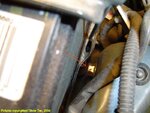
Now open the hood and locate the two 14mm flange bolt (by the red arrows)
[attachmentid=50]
[attachmentid=51]
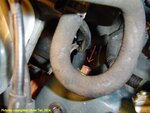
you might have to move the hose a bit to fit the tool in there to take the flange bolt off.
[attachmentid=52]
Loosen them up with the 14mm socket.
Next, remove the cotter pin, then loosen and remove the castle nut beneath the ball joint boot on the upper arm. This is indicated by the blue arrow on the close-up pic above.
This is where I ran into a little trouble. After removing the castle nut and the two flange bolts, I couldn't get the old upper arm off. I got kind of frustrated and hacked the ball joint boot to pieces and hammered it out from beneath. It worked but it was a bit messy. <_<
[attachmentid=53]
Then take the old upper arm off and replace it with the skunk2 unit. Each arm is stamped with either and R for Right or L for Left. I don't think it really matters, but remember to put the L on the driver's side and R on the passenger's.
[attachmentid=54]
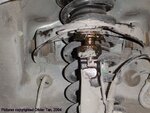
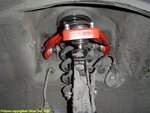
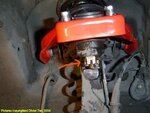
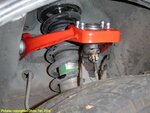
Here is what it looks like after putting the skunk2 unit on and tightening the bolts (the flange bolts should be tightened to 40 lbf.ft according to the service manual)
[attachmentid=55]
[attachmentid=56]
[attachmentid=57]
Put the wheel back on after checking the bolts and you're done for that side!
The other side was a lot easier. Now that I knew how to do it it was a breeze and I didn't even have to destroy the old ball joint boot. One thing is you'll have to take out the battery when working on the passenger's side.
Here are where the passenger side flange bolts are
[attachmentid=58]
[attachmentid=59]
This whole install shouldn't take you more than an hour and a half.
I hope this will help out some of you.
Now I'm off to get it aligned
I went with a Skunk2 front camber kit (which I got new for $175). The kit is very simple. It comes with two adjustable upper arms. The install is simple enough but Skunk2 does not provide any instructions, so I figured now would be the time to write up a how-to article.
Here we go:
The Skunk2 camber kit
[attachmentid=44]
you'll need these tools
[attachmentid=45]
First, jack up the car and take the wheel off. I started on the driver's side (left) first.
[attachmentid=46]
Look at the tread... ouch
[attachmentid=47]
A couple pics of the OE upper arm.
[attachmentid=48]
[attachmentid=49]
Now open the hood and locate the two 14mm flange bolt (by the red arrows)
[attachmentid=50]
[attachmentid=51]
you might have to move the hose a bit to fit the tool in there to take the flange bolt off.
[attachmentid=52]
Loosen them up with the 14mm socket.
Next, remove the cotter pin, then loosen and remove the castle nut beneath the ball joint boot on the upper arm. This is indicated by the blue arrow on the close-up pic above.
This is where I ran into a little trouble. After removing the castle nut and the two flange bolts, I couldn't get the old upper arm off. I got kind of frustrated and hacked the ball joint boot to pieces and hammered it out from beneath. It worked but it was a bit messy. <_<
[attachmentid=53]
Then take the old upper arm off and replace it with the skunk2 unit. Each arm is stamped with either and R for Right or L for Left. I don't think it really matters, but remember to put the L on the driver's side and R on the passenger's.
[attachmentid=54]
Here is what it looks like after putting the skunk2 unit on and tightening the bolts (the flange bolts should be tightened to 40 lbf.ft according to the service manual)
[attachmentid=55]
[attachmentid=56]
[attachmentid=57]
Put the wheel back on after checking the bolts and you're done for that side!
The other side was a lot easier. Now that I knew how to do it it was a breeze and I didn't even have to destroy the old ball joint boot. One thing is you'll have to take out the battery when working on the passenger's side.
Here are where the passenger side flange bolts are
[attachmentid=58]
[attachmentid=59]
This whole install shouldn't take you more than an hour and a half.
I hope this will help out some of you.
Now I'm off to get it aligned
Attachments
-
 skunk2_camber_kit_1.jpg80.9 KB · Views: 3,037
 -
 skunk2_camber_kit_2.jpg130.7 KB · Views: 2,075
 -
 skunk2_camber_kit_3.jpg79.9 KB · Views: 2,214
 -
 skunk2_camber_kit_4.jpg74 KB · Views: 2,103
 -
 skunk2_camber_kit_5.jpg70.8 KB · Views: 2,190
 -
 skunk2_camber_kit_6.jpg73.1 KB · Views: 2,310
 -
 skunk2_camber_kit_7.jpg92.8 KB · Views: 2,640
 -
 skunk2_camber_kit_8.jpg74.2 KB · Views: 2,060
 -
 skunk2_camber_kit_9.jpg59.9 KB · Views: 1,978
 -
 skunk2_camber_kit_10.jpg81.7 KB · Views: 2,782
 -
 skunk2_camber_kit_11.jpg72.9 KB · Views: 3,319
 -
 skunk2_camber_kit_12.jpg71.9 KB · Views: 13,148
 -
 skunk2_camber_kit_13.jpg73.7 KB · Views: 2,360
 -
 skunk2_camber_kit_14.jpg70.3 KB · Views: 6,113
 -
 skunk2_camber_kit_15.jpg61.2 KB · Views: 2,118
 -
 skunk2_camber_kit_16.jpg59 KB · Views: 1,982