Soldering Tutorial

We may earn a small commission from affiliate links and paid advertisements. Terms

How to Solder​


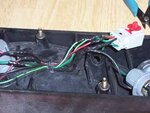
In these photos I'm changing the plug connector and replacing a missing bulb socket on a taillight I got at the junkyard. That's not the point though. The point here is to show you guys how to solder. I see a lot of crap wiring out there. It's scary, it's just bad and there's no reason for it. Soldering doesn't require any expensive equipment or any great skill. It takes less than $50 for tools and supplies and maybe a couple hours practice.

Tools Required:
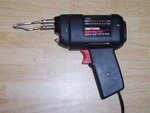
*100 Watt soldering "gun" from Sears or Radio Shack $30
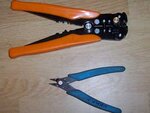
**wire stripper from Harbor Freight $10

Supplies
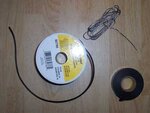
spool of .032 solder
electric "black" tape
***spool of 18 gauge stranded wire
inline fuse holder (depending on what you're trying to make)
split loom aka corrugated tubing
small zip ties

*Don't get that "cold solder" crap. The name itself is reason enough. A "cold" solder is a bad solder joint. Don't get a low wattage pencil shaped soldering iron (unless its a butane iron). Get yourself a Craftsman 100/140 watt gun shaped soldering iron with the little light on the end (or similar). The quality of the soldering iron and solder will determine the quality of the job and whether you ever learn to solder successfully.


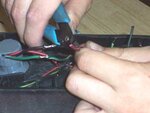
**The quick strip tools are the most desirable (orange handles), however, I often rely on my little cutting tool (blue handles). I got this from the Snap On guy, although it is not made by Snap On. If you use this tool, squeeze the wire until you feel the tool bite into the insulation, then push the tool upward with the thumb on the same hand that is bracing the wire (see photo). I recommend against the most common type of wire strippers.


*** 18 gauge works for most things we do to our cars, but use your own discretion. Starter/alternator wires are 10 gauge. If you want to upgrade your ignition/fuel/lighting wiring you might want to use 16 gauge, but no thicker than 14 gauge.


Steps:
Wash your hands. You want to reduce the amount of human contaminants in the joint to prevent corrosion.

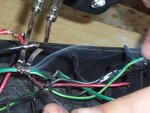
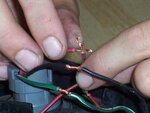
Strip back the insulation on each of the wires half an inch. Twist the wires together. Don't use the traditional method of twisting them together. You want the twist inline with the wire. Make sure there are no points sticking up. Roll the wires together like a joint (pun intended). Hey, this is how I was taught, okay?!


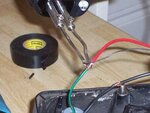
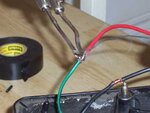
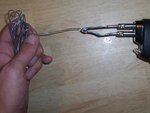
Heat up the soldering gun and then touch the solder to the tip and get a thin layer of solder at the point. Lay the twisted portion of the wires on top of the soldering point, and then wait a few seconds for the wire to heat up. Touch the solder to the wire strands (not the soldering gun). You'll notice that the wire itself liquifies the solder and it soaks between the strands. You want to lightly paint the entire joint this way. The strands need to remain visible. You don't want a big goober on top of the wire. Less is more. Don't overheat the joint. If the insulation starts to boil off the wires, you're overheating it. Work faster.


Wrap the joints in electric tape. Electric tape is the only tape that will work. Stretch the tape slightly when wrapping it up. Squeeze the joint between your fingers to make sure a strand isn't poking through. In most cases you'll want to bundle your wires with tape or split loom, then secure them with zip ties.


Now get out there and redo all your shitty wiring. Then, once you have some practice under your belt, go out and make some money building harnesses and doing conversions for people.
 

Attachments

  • solder.jpg
    solder.jpg
    12.7 KB · Views: 1,815
  • solder2.jpg
    solder2.jpg
    11.8 KB · Views: 1,781
  • solder3.jpg
    solder3.jpg
    11.1 KB · Views: 1,708
  • solderGun.jpg
    solderGun.jpg
    8.3 KB · Views: 2,685
  • strip.jpg
    strip.jpg
    8.9 KB · Views: 1,777
  • strippers.jpg
    strippers.jpg
    9.9 KB · Views: 1,784
  • supplies.jpg
    supplies.jpg
    9.2 KB · Views: 1,779
  • tape.jpg
    tape.jpg
    13.3 KB · Views: 1,696
  • tin.jpg
    tin.jpg
    8.1 KB · Views: 1,702
  • twist.jpg
    twist.jpg
    9.7 KB · Views: 1,754
Last edited by a moderator:
What about solder flux, man? You didn't even mention it. This is a good tutorial, but keep in mind that these methods do NOT work for everything. I would never take that large of a soldering iron to my ecu, for example. My pencil 40w iron works well for my car audio needs and is much easier to handle. One more thing; use shrink tubing whenever possible to seal the joints. It is leaves a much stronger joint, which means less broken connections. I never use electrical tape for anything unless it's temporary. But good writeup nonetheless for someone who has never soldered before.

oh, yeah. there is already a soldering writeup in the articles section.
 
Thank you for your constructive criticism, however, I disagree with you on every point.

The flux is mixed in with the solder.

The other writeup covers circuit boards. It leaves much to be desired.

Shrink tubing requires a heat gun. I want to keep the tutorial as simple and cost effective as possible because I imagine that most of the audience is thinking of doing this for a specific project and then maybe never again. I disagree that heat shrink tubing makes a joint stronger. If the strain on the wire is strong enough to break the joint, then the heat shrink isn't going to make a difference. Heat shrink seals better in most cases, and is cleaner, but the wiring shouldn't be under any kind of strain. If the wire is strained you need to extend it.

I have never once had a broken solder joint and I don't know any professional who has. You say less broken joints, but I believe that a single broken joint is unacceptable. You must be dripping solder on top of the wiring. The solder will crack when you flex the wire. You need to get a hotter temp soldering iron so that the solder soaks between the strands. 40W is inadequate for soldering wire 18 gauge or thicker.

I've been doing car audio/security for over 8 years. I am responsible to warranty labor on every car I have ever worked on. My tutorial is complete. Everyone has their own technique, but this tutorial is the basis for a good solder joint.

The context of the site is DIY car repair/modification. ECU modification is a topic unto itself and I don't feel I'm the most qualified to write about it. I think if you were to write a soldering tutorial for the purpose of ECU modification, it would be a great supplement to mine.
 
Last edited:
If I saw that a professional used electrical tape on anything he installed in my car, I would never use his service again, just my opinion. Shrink tubing doesn't require anything more than a blow dryer, which is what I've used almost everytime. I agree that a single broken joint is unacceptable, but I'm speaking over the long term, if a joint is in a position where it could be flexed, tape will not do an acceptable job of supporting the joint; it also looks second rate, and will dry out over time, as I'm sure you have seen in your many years of car audio security. I tend to work on friend's cars a lot, and see a lot of cheesy electrical hackjobs done by 'pros'. I am not dissing your work in any way. I was not aware that flux was mixed in with the solder. Your technique looks good. I disagree that a 40w is inadequate for 18 gauge, as I have used it, and have never left the solder beading up on the outside of the wire.
 
What I find strange in your insistence against electric tape is the fact that EVERY OEM manufacturer uses it. From Honda to BMW. There is a lot of variation in tape quality. Find a good brand and stick to it. You'll find that like the OEM tape, it doesn't dry out.

My specialty is custom alarm installs. In my installs, I mimic the factory wiring; split loom and electric tape, cleanly dressed, and properly secured. I'm no stranger to heat shrink. I use it about as often as you find it on the factory wiring.
 
Flux core solder does have the solder mixed in, but it's not always enough. You can never have too much flux.
 
i solder for a living (i work in electronics manufacturing for a gov't contractor) and heres some information that is useful:

1. when soldering, you want to hold the soldering iron and the solder to the part you are soldering for 3-5 seconds.
2. when wrapping wire together, wrap the wire a minimum of 3 complete wraps around. take a pair of needle nose pliers and squeeze the wraps close together so that the wraps touch each other. trim off excess leads with wire cutters and then solder. you want a good coat of solder on there. you should still be able to see the wraps under the solder.
3. 100/140 watt soldering gun is WAY to hot!! you need only a 10 watt for basic soldering. an adjustable soldering iron is also acceptable to have.
4. recommended tools: needle nose pliers, wire cutters, soldering iron holder, a sponge to clean your soldering iron tips during use, water for sponge, braided solder wick, a short bristle brush, a bottle of isopropanol alchol and a fan in front of the part you are soldering that is pointed away from you to suck the solder fumes away from you when soldering.
5. if soldering onto PCBs (also known as PWB aka circuit boards), make sure you are properly grounded. some components are so sensitive to static electricity that your body cannot feel small amounts of static electricity but that small amount can damage components on the circuit board. you can get grounding straps at Radio Shack i believe. you can either get a wrist type or ones that you wear on your shoes.
6. work in a well ventilated, clean and well lit area.
7. clean the excess flux off using the brush and the isopropanol alcohol.

thats some additional useful information. any questions, feel free to drop me a message.
 
Last edited:
I'm done muddying up your article, but I'll say this. OEM manufacturers use electrical tape because it saves them money, not because it's the best and cleanest way to do things. And yes, I've seen plenty of dried out OEM tape, it happens.
 
100 Watts is not too hot for the kind of soldering you do on the car. The 140 watts option is useful when you get frustrated waiting the 3 seconds it takes for the soldering gun to warm up. I'd hate to try to solder the 10 gauge starter wire back together with anything less than 100 watts. The second biggest problem I have with the lower watt soldering irons is the amount of time they take to warm up. Most of the time I use my butane soldering iron anyway.

Granted, I solder all day long with the intent to bang the jobs out. If I was soldering for the military (they probably x-ray those), or I was soldering a circuit board (god knows why I would ever do either), I would do it differently. Even though my method is streamlined for speed, I don't believe that quality suffers. All of my labor is warrantied for the lifetime of the car. I have never once had an R&R that boiled down to a bad or failed solder joint.

Never had a need to add flux with good solder. The whole process takes a matter of seconds. The solder soaks itself right up into the joint.

Eventhough I don't agree with everything said, and other things I agree with but I think it's unnecessary overkill, I do appreciate all of the responses. It's a big help to anyone reading this thread to have other perspectives. I appreciate it and I don't feel like it muddy's up the thread. Only flaming can accomplish that.

Ever tried to tell an old-hat how to do something better that they've been doing for years?! Maybe that's me... just being stubborn.
 
100 watts is definitely not too much power. We solder with tips that are calibrated at 700 degrees F. You just don't want to overload your joint with heat and take the chance of damaging something, so a hot iron with enough wattage to just touch and go without having to hold in a location too long is perfect.

Butane irons are wonderful for working in cars. ;)

We solder all day trying to bang stuff out for the military too. You'd be surprised how fast our guys are. ;) Our budget for tools is probably quite a bit higher than yours though. We actually don't X-ray our solder joints unless there's something wrong. Most solder inspection is just optical.

If you never have to add flux, great! I always find that having an ample supply around is a good thing, and it does help to wick the solder into place. I do tend to use non flux core solder too, so having tons of flux around is a must.

As far as you being old-hat? You're still younger than me. ;)
 
I saw this link How To Solder - Soldering Tutorial over at digg, and took a quick peak at it as I've been soldering for about 15+ years now. That little how to fails to mention the use of flux, I've always said flux is your friend. also as far as the cleanup I've only used solvents to remove flux and rosin, no need to use steel wool or sandpaper. Another thing to note is that the word is moving toward RoHS compliant soldering techniques, these solders do not contain lead and usually have a much higher silver content and require higher heat to melt and are much more difficult to solder with.

some other reference for the technical bits is from wikipedia
soldering : Soldering - Wikipedia
flux : Flux (metallurgy) - Wikipedia
solder : Solder - Wikipedia
 
Last edited by a moderator:
Back
Top