I recently swapped out my automatic trans for a manual one and decided to do a write-up on how to do it and what to expect when doing this swap. This was done in a 95 Integra although the process should be the same for the entire line of cars.
Disclaimer: This guide is meant to assist in the conversion of an Automatic 94-01 Integra to a Manual. All torque specs should be verified using a repair manual or similar source, I am not responsible for you striping out bolts or parts because you followed this guide instead of verifying the values for yourself. I am not responsible for any damage to your vehicle, yourself or others.
Parts you will need:
(If I listed it then it is different and you do need it.)
Transmission
Clutch fork and throw-out bearing
Flywheel and flywheel bolts
Clutch and pressure plate with bolts
Manual axles
Manual Half-shaft
Manual engine to transmission brace
Manual Bell housing cover
Manual trans in auto body mount(Innovative makes a good one)
Rear engine T mounting bracket
Shift linkage with bushings
Shift linkage rear mount
Shift lever with knob, boot and boot bracket
Clutch Slave cylinder
Clutch Master cylinder
Clutch line and fittings(I used a steel braided line and the fittings I got at ACE)
Clutch fluid reservoir(I used a Kobalt 11oz paint cup for a paint gun from Lowes for $7)
Clutch pedal assembly with switches
Manual ECU or you can find a write-up on how to convert your auto ECU to manual
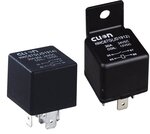
Automotive relay
Step 1.
Disconnect the battery, drain the transmission fluid and remove the two transmission lines from the radiator.

Step 2.
Remove center console.

Step 3.
Remove sear selector handle and gear indicator plate.

Step 4.
Disconnect cable linkage.


Step 5.
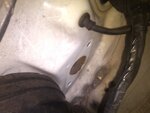
Remove nuts from the two plates underneath the car then remove plates, selector assembly and wires. You will have to make cover plates for the holes afterwards.


Step 6.
There are two holes that are covered right at the edge of the carpet that are for the shift linkage mount. Drill out the holes. For extra support you can also make a plate with two holes to bolt on top. Insert bolts onto the holes.


Step 7.
Underneath the car install the shift linkage mount and shift linkage. You can leave the linkage hanging for now.

Step 8.
Remove intake manifold and unplug all wires going to the transmission and starter.

Step 9.
Remove the transmission cable from the throttle wheel.


Step 10.
Remove front wheels and axle nuts.

Step 11.
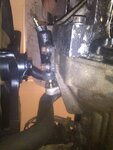
Remove the two bolts from the lower control arm and then remove axles and half shaft.

Step 12.
Remove the torque converter cover then remove the torque converter bolts from the drive plate.


Step 13.
Remove engine to transmission brace and engine/transmission rear T mounting bracket.


Step 14.
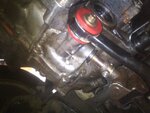
Make sure you have both the engine and transmission supported so the don't fall and either get damaged or damage the frame or mounts. Remove all of the transmission to engine bolts. Remove the lower and upper transmission mounts. The transmission can now be slid out from underneath the car.


Step 15.
Remove the drive plate bolts.

Step 16.
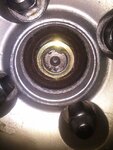
Install the flywheel bearing and then install the flywheel on the crank shaft. I used Thread-Loc and torqued the bolts to 76ftlbs in a crisscross pattern.


Step 17.
Install clutch and pressure plate onto the flywheel. I recommend using the alignment tool to make things easier. I used Thread-Loc and torqued these bolts to 19ftlbs in a crisscross pattern.

Step 18.
Install the new transmission mount onto the manual transmission and slide the transmission under the car. Lift the transmission into the engine bay and slide the input shaft on the transmission into the clutch. Bolt the engine to the transmission and the transmission mount to the frame. I used Thread-Loc and torqued all of the transmission mount bolts on the transmission and all of the transmission to engine mounting bolts to 47ftlbs. I used Thread-Loc and torqued the transmission mount to frame bolt to 54ftlbs.


Step 19.
Install the manual flywheel cover, engine to transmission brace, rear engine/transmission T mounting bracket and half shaft. They are all different.


Step 20.
Connect the shift linkage to the transmission.

Step 21.
Install manual axles and install the bolt/nut onto the lower control arm. I used Thread-Loc and torqued the bolt to 47ftlbs.

Step 22.
Install axle nuts and wheels. Make sure that after you torque the axle nuts you use a punch and a hammer or I used a flat-head screwdriver and a hammer to dent in the lip of the axle nut into the groove. I torqued the axle nuts to 134ftlbs.

Step 23.
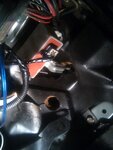
Unbolt the interlock relay and remove the rely and plate from the car.


Step 24.
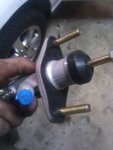
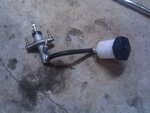
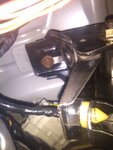
Remove the rubber gasket from the plate and put it on the clutch master cylinder. Attach the fluid reservoir to the clutch master cylinder and insert the clutch master cylinder into the hole on the firewall. For the fluid reservoir I used a $7 Kobalt 11oz paint cup for a paint gun. I removed the clip it had and used a cut-off disk on my Dremel to remove the wing-nut then used a piece of hose and hose clamps to attach it to the master cylinder.


Step 25.
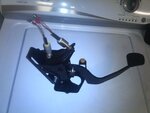
Solder wires to the contact pins of the clutch switches. If you have the connectors for the clutch switches then you can use them instead. I disassembled, blasted, painted, greased and re-assembled my clutch pedal assembly but it's not required. Install the clutch pedal assembly and attache to the clutch master cylinder.


Step 26.
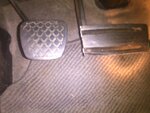
Use the clutch switches to adjust the pedal height to match the brake pedal then tighten the lock nuts. Remove the rubber cover from the brake pedal and cut the pedal along the brake pedal arm then re-attach the rubber cover.


Step 27.
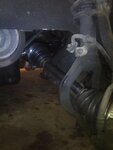
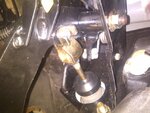
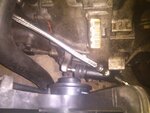
Install clutch slave cylinder onto the transmission and connect clutch line to the clutch master cylinder and the clutch slave cylinder. Fill reservoir with fluid and bleed the clutch slave cylinder. I used Thread-Loc and torqued the clutch slave cylinder bolts to 17ftlbs.


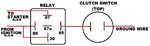
Step 28.
Take the wide plug from where the gear selector wiring plugged into, an automotive relay and use the schematic I made to wire in the top clutch switch. It doesn't matter which pin on the clutch switch the wires go to.

Step 29.
Run a wire from one pin on the bottom clutch switch to the pink wire in the connector. Run a wire from the other pin on the clutch switch to ground.
Step 30.
Run two wires from the transmission reverse switch to the plug from the previous step. One wire from the switch will connect to the yellow wire and the other wire from the switch will connect to the green/black wire. Once again it doesn't matter which wire from the switch gets connected to which wires from the plug.
Step 31.
Replace your auto ECU with a manual ECU or convert your auto ECU to manual.(Not covered in this guide.)
Step 32.
Connect wires to the starter.
Step 33.
Fill transmission with 2.3qts of MTF fluid. Check for any leaks.
Step 34.
Connect the battery, check to make sure your reverse lights light up and then start the car. Check for leaks then drive around the block and back. Make sure the car shifts like it's supposed to, the clutch works properly and there are no leaks.
Step 35.
Install center console and shift boot.
You're done!
Disclaimer: This guide is meant to assist in the conversion of an Automatic 94-01 Integra to a Manual. All torque specs should be verified using a repair manual or similar source, I am not responsible for you striping out bolts or parts because you followed this guide instead of verifying the values for yourself. I am not responsible for any damage to your vehicle, yourself or others.
Parts you will need:
(If I listed it then it is different and you do need it.)
Transmission
Clutch fork and throw-out bearing
Flywheel and flywheel bolts
Clutch and pressure plate with bolts
Manual axles
Manual Half-shaft
Manual engine to transmission brace
Manual Bell housing cover
Manual trans in auto body mount(Innovative makes a good one)
Rear engine T mounting bracket
Shift linkage with bushings
Shift linkage rear mount
Shift lever with knob, boot and boot bracket
Clutch Slave cylinder
Clutch Master cylinder
Clutch line and fittings(I used a steel braided line and the fittings I got at ACE)
Clutch fluid reservoir(I used a Kobalt 11oz paint cup for a paint gun from Lowes for $7)
Clutch pedal assembly with switches
Manual ECU or you can find a write-up on how to convert your auto ECU to manual
Automotive relay
Step 1.
Disconnect the battery, drain the transmission fluid and remove the two transmission lines from the radiator.
Step 2.
Remove center console.
Step 3.
Remove sear selector handle and gear indicator plate.
Step 4.
Disconnect cable linkage.
Step 5.
Remove nuts from the two plates underneath the car then remove plates, selector assembly and wires. You will have to make cover plates for the holes afterwards.
Step 6.
There are two holes that are covered right at the edge of the carpet that are for the shift linkage mount. Drill out the holes. For extra support you can also make a plate with two holes to bolt on top. Insert bolts onto the holes.
Step 7.
Underneath the car install the shift linkage mount and shift linkage. You can leave the linkage hanging for now.
Step 8.
Remove intake manifold and unplug all wires going to the transmission and starter.
Step 9.
Remove the transmission cable from the throttle wheel.
Step 10.
Remove front wheels and axle nuts.
Step 11.
Remove the two bolts from the lower control arm and then remove axles and half shaft.
Step 12.
Remove the torque converter cover then remove the torque converter bolts from the drive plate.
Step 13.
Remove engine to transmission brace and engine/transmission rear T mounting bracket.
Step 14.
Make sure you have both the engine and transmission supported so the don't fall and either get damaged or damage the frame or mounts. Remove all of the transmission to engine bolts. Remove the lower and upper transmission mounts. The transmission can now be slid out from underneath the car.
Step 15.
Remove the drive plate bolts.
Step 16.
Install the flywheel bearing and then install the flywheel on the crank shaft. I used Thread-Loc and torqued the bolts to 76ftlbs in a crisscross pattern.
Step 17.
Install clutch and pressure plate onto the flywheel. I recommend using the alignment tool to make things easier. I used Thread-Loc and torqued these bolts to 19ftlbs in a crisscross pattern.
Step 18.
Install the new transmission mount onto the manual transmission and slide the transmission under the car. Lift the transmission into the engine bay and slide the input shaft on the transmission into the clutch. Bolt the engine to the transmission and the transmission mount to the frame. I used Thread-Loc and torqued all of the transmission mount bolts on the transmission and all of the transmission to engine mounting bolts to 47ftlbs. I used Thread-Loc and torqued the transmission mount to frame bolt to 54ftlbs.
Step 19.
Install the manual flywheel cover, engine to transmission brace, rear engine/transmission T mounting bracket and half shaft. They are all different.
Step 20.
Connect the shift linkage to the transmission.
Step 21.
Install manual axles and install the bolt/nut onto the lower control arm. I used Thread-Loc and torqued the bolt to 47ftlbs.
Step 22.
Install axle nuts and wheels. Make sure that after you torque the axle nuts you use a punch and a hammer or I used a flat-head screwdriver and a hammer to dent in the lip of the axle nut into the groove. I torqued the axle nuts to 134ftlbs.
Step 23.
Unbolt the interlock relay and remove the rely and plate from the car.
Step 24.
Remove the rubber gasket from the plate and put it on the clutch master cylinder. Attach the fluid reservoir to the clutch master cylinder and insert the clutch master cylinder into the hole on the firewall. For the fluid reservoir I used a $7 Kobalt 11oz paint cup for a paint gun. I removed the clip it had and used a cut-off disk on my Dremel to remove the wing-nut then used a piece of hose and hose clamps to attach it to the master cylinder.
Step 25.
Solder wires to the contact pins of the clutch switches. If you have the connectors for the clutch switches then you can use them instead. I disassembled, blasted, painted, greased and re-assembled my clutch pedal assembly but it's not required. Install the clutch pedal assembly and attache to the clutch master cylinder.
Step 26.
Use the clutch switches to adjust the pedal height to match the brake pedal then tighten the lock nuts. Remove the rubber cover from the brake pedal and cut the pedal along the brake pedal arm then re-attach the rubber cover.
Step 27.
Install clutch slave cylinder onto the transmission and connect clutch line to the clutch master cylinder and the clutch slave cylinder. Fill reservoir with fluid and bleed the clutch slave cylinder. I used Thread-Loc and torqued the clutch slave cylinder bolts to 17ftlbs.
Step 28.
Take the wide plug from where the gear selector wiring plugged into, an automotive relay and use the schematic I made to wire in the top clutch switch. It doesn't matter which pin on the clutch switch the wires go to.
Step 29.
Run a wire from one pin on the bottom clutch switch to the pink wire in the connector. Run a wire from the other pin on the clutch switch to ground.
Step 30.
Run two wires from the transmission reverse switch to the plug from the previous step. One wire from the switch will connect to the yellow wire and the other wire from the switch will connect to the green/black wire. Once again it doesn't matter which wire from the switch gets connected to which wires from the plug.
Step 31.
Replace your auto ECU with a manual ECU or convert your auto ECU to manual.(Not covered in this guide.)
Step 32.
Connect wires to the starter.
Step 33.
Fill transmission with 2.3qts of MTF fluid. Check for any leaks.
Step 34.
Connect the battery, check to make sure your reverse lights light up and then start the car. Check for leaks then drive around the block and back. Make sure the car shifts like it's supposed to, the clutch works properly and there are no leaks.
Step 35.
Install center console and shift boot.
You're done!
Attachments
-
 IMG_20130324_175640.jpg55.5 KB · Views: 44,558
 -
 IMG_20130324_212203.jpg41.9 KB · Views: 30,439
 -
 IMG_20130324_213642.jpg73.8 KB · Views: 29,770
 -
 IMG_20130324_214025.jpg46.6 KB · Views: 29,772
 -
 IMG_20130324_214816.jpg40.8 KB · Views: 29,561
 -
 IMG_20130324_214908.jpg52.6 KB · Views: 29,416
 -
 IMG_20130324_215041.jpg41.1 KB · Views: 29,287
 -
 IMG_20130324_215800.jpg49 KB · Views: 29,127
 -
 879686002727.jpg2.8 KB · Views: 28,345
 -
 IMG_20130323_004019.jpg37.1 KB · Views: 30,996
 -
 IMG_20130324_221450.jpg60.8 KB · Views: 29,015
 -
 IMG_20130324_222157.jpg49.4 KB · Views: 29,243
 -
 IMG_20130324_222202.jpg61.1 KB · Views: 30,303
 -
 IMG_20130324_223011.jpg49.8 KB · Views: 28,944
 -
 IMG_20130324_223050.jpg52.6 KB · Views: 29,663
 -
 IMG_20130324_223901.jpg55.8 KB · Views: 29,540
 -
 IMG_20130324_223942.jpg51.9 KB · Views: 29,846
 -
 Relay.jpg40.6 KB · Views: 2,080
 -
 IMG_20130326_182028.jpg48.7 KB · Views: 2,370
 -
 Wiring.jpg36.6 KB · Views: 30,214
Last edited: