How to Install an Aftermarket Steering Wheel
Ok before I begin, I know that there are already plenty writeups on this but I've found most of them to be incomplete and only cover the actual installation of the wheel.
In this write up, I intend to give you as complete guidelines as possible to remove the stock steering wheel, install the new hub, quick release, and steering wheel, wire the horn, jump your SRS system so that your other airbags still work, and how to relocate your cruise control.
Disclaimer:
Now remember this is only a guide and I nor the owners of this site assume responsibility for any injuries or damages you do to yourself or your vehicle.
This write up is particular to the EM1 99-00 civic si, but can be used as a guide for other Honda'ss.
Now that's out the way a few of the tools you will need to complete this project.
19mm socket and ratchet
Philips screwdriver
T30 Torx driver, they come as torx bits and torx sockets, I prefer the socket style, for those of you that don't know what they are, here's a pic
First thing you wanna do is make sure your wheels are straight. Once that's done turn off you vehicle and lock the wheel so it stays straight. Next disconnect your battery, both cables ( I only disconnected the neg. cable and everything still turned out fine), but the manual says to do both. Wait at least 3 minutes to let the power drain from the vehicle. Make sure you have the security code for our radio before disconnecting the battery if applicable.
Next there are 2 tabs, 1 on either side of the steering wheel that needs to be removed, pictured below are the locations
Right Side
Left Side
Now you remove the 2 torx screws, 1 on either side of the wheel, torx screw is pictured above and circled in blue.
Now you remove the cruise control switch if equipped that's on the right side of the wheel. It's bolted in place via 2 Phillips screws.
Pic upon removal
Once those are out unclip the connector tabs attached to the unit then you can just pull off the airbag portion of the wheel, be care not to drop hit or handle it roughly. Now you should be looking at an image like this.
Now grab your ratchet and 19mm socket and unscrew the nut in the center of the wheel, once this is off you can just pull off the wheel, if it's not coming off pull down the tilt adjustment lever s you can move the steering column up and down to get it in the right position that will allow the wheel to come off. Now you should be looking at something like this
and if you have airbags this SRS reel will be on there as well
Now I've seen a prelude that had a Momo hub that had enough space to leave the reel in place, however my hub would not allow this so remove the reel by removing the 3 phillips screws holding it in place and also unlatching the yellow connector which you will find if you just follow the wires from the wheel to under the dash, I didn't know this at the time and just ended up cutting the wires, The connector has a spring loaded latch that you just pull back and the other half pops out, the half that you pull back looks like this
Ok now you're ready to put on your new hub and quick release. Now the easiest way is to find the dots/indentations on the hub and quick release. They mean up or top. Now while the hub itself doesn't have to be in the top position the release does need to be straight, that is if you want your steering wheel to be straight when you put it on. Now you use the 19mm nut that you took off earlier to bolt your new hub in place, then attach the quick release making sure to attach the wires from the hub to the quick release before bolting it down. Now it should look like this
Now for the horn:
There's a black female connector with 3 wires, Get a wire tap and a short piece of wire and tap into the mustard color wire. If you don't have this color wire, just grab a multi meter and locate the wire that's giving off 12v, there should only be one wire giving off any readings.
Grab your steering wheel and unscrew this metal tab.
or you can come up with your own way to get the hot wire to make connection to the back of the hub. This is what I came up with and it was quite simple. Ok now screw the tab onto one of the post that you unscrewed your srs reel from. Hook up the hot wire to one end of the tab and bend the other end of the tab so that it makes constant contact with the back of the hub.
Ok now put your steering column covers back on cause you're done with the wheel and horn.
Cruise Control
Now unscrew the panel from the bottom of the driver's side dash. Look up under there for a gray connector with 3 wires, these are for your cruise control. One is a hot wire, should be the same 3 color wires from the female connector that you just tapped for your horn. The mustard colored wire is still the hot wire or whatever color was your hot wire up top. Tap all 3 wires with wires long enough to reach to wherever you're going to be mounting your cruise control.
If you plan on using the same switch from the steering wheel, f you can find a good place to mout it, grab the srs reel and cut the green connector off. Cut the wire to leave enough room to add connectors on the end.
Add connectors to the wires that yu tapped from under the dash
You don't have to use these same type of connectors that I used, you can use straight end to end connectors. I usd these cause I knew I would be changing the switch later. Now hook the green connector up to the wires you tapped.
I knew I wanted my switch to be close and in easy reach and I decided on my center console as it's new home. But after I placed the switch where I wanted it to be I didn't like it on account of there being space where you could look through the hole .
So I went and shopped around for the right switch. Took me almost a week to find it. Finally tracked it down at an Electronics specialty shop. Radio shack had one but it was a push button and I wasn't sure if it would work right. Besides I wanted a rocker switch. Anyways, the type of switch you should be hunting for is a SPDT or 3 way switch that is momentary center off and on in both directions. If you want the exact switch I used you would ask for a single pole double throw momentary rocker switch, w/ center off and on in both directions. Hook up is simple. Just hook the hot wire onto the center terminal of the switch and the other 2 wires on the 2 remaining post, one wire is for the set/decel and the other one is for the resume/accel option. Then just position the switch in whatever direction you want it to be. Here's the finished product.
SRS Jumper
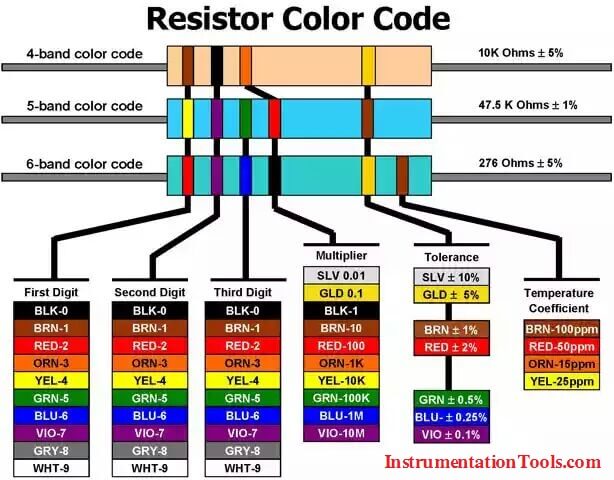
Ok now finally, Since you removed your stock steering wheel and replaced it with aftermarket one, more than likely you no longer have an airbag there so when you hook back up your battery the computer will realize a break in the srs system and disable it and your srs light will light up, if you want the other airbags in your car to work and also don't want to have your SRS light on constantly. All you need to do is find a 2.2 ohm resistor, not 2.2k and wire it into the srs system. You can find them at an electronics store. You can find them at radio shack also, many people say that they can't find them even the clerks at the shop say that they don't have them, but they do.
They don't have them in individual 5 packs but they have a 500 pack bundle of resistors. I bought it cause I always need resistors for different projects and it was only $12.49. Only thing that sucked was that they didn't have them labeled so I had to pull it the old multi meter to test the resistance of each set till I found the right set.
But since I'm such a nice guy I'll tell you which set of resistor you need. It's the one with 2 gold bands on one side and 2 red bands on the other
Reference Colors:
Now if you pulled the connector like I said to disconnect the srs reel there should be a yellow male connector hanging under your dash as you're looking at the pic, it's the connector that's dangling closest to the brake pedal.
Now cut one of the female connectors fron the airbag assembly and place your resistor in it.
Now just hook up the plugs and you're done.
Now if you didn't hook up the battery before completing the srs process you should be done and when you start your car the srs light should come on and go off as usual. If it stays on you either hooked your battery up for some reason or the resistor isn't making contact. Check your resistor plug then you have to reset your srs system. Just follow these simple steps
1. Pull the MES connector that is located in the upper right corner of the under dash fuse box. This is the location circled in blue
This is the MES connector
2. With the ignition off insert a jumper wire or paperclip into the MES connector. If you're used to pulling error codes you should have no problem here.
3. Turn the ignition to the 2nd position, don't start the car, the srs light should go off after 6 seconds
4. As soon as the light goes off remove the paperclip, the light comes back on
5. Place the paperclip back in the connector, when the light goes off remove the paperclip. The light should blink 2 times then go off. turn ignition off wait 10 seconds then start vehicle as normal.
If the light comes back on the resistor isn't making contact.
Here's the finish products
No SRS
Hub and release
Wheel
Cruise control
Last edited by a moderator: