My first civic

We may earn a small commission from affiliate links and paid advertisements. Terms

Well it is stock and it is on a D Series.. what'd you expect? lol

i suppose it may be smaller cause its a y7. i'm almost certain the y8 intake is larger..

Anyways. I just went past your pics again and totally spotted your cheapy train horn lol
 
What is power without control is my theory.

Koni Yellow sports, Blox LCA, ASR and CTR rear swaybar
IMG_6217.jpg

IMG_6223.jpg

IMG_6220.jpg

IMG_6221.jpg


IMG_6222.jpg

IMG_6223.jpg

IMG_6226.jpg

IMG_6227.jpg

IMG_5875.jpg


IMG_5876.jpg

IMG_5878.jpg

IMG_5880.jpg

IMG_5884.jpg

IMG_5885.jpg
 
looks like you are really getting down to business with your first civic. nice start for sure!
 
looks like you are really getting down to business with your first civic. nice start for sure!

thanks
picked up a used Y8 that I'm going to rebuild.
do it once and do it right
i don't know how some people can just slap in a used motor?
IMG_5738.jpg

IMG_5739.jpg


IMG_5742.jpg

IMG_5743.jpg

IMG_5744.jpg

IMG_5745.jpg


IMG_5746.jpg

IMG_5747.jpg
 
Last edited:
Those brakes look good. I should have thought about painting the dust guards on my brakes. Did you get any springs for those struts?
 
Those brakes look good. I should have thought about painting the dust guards on my brakes. Did you get any springs for those struts?

Those brakes are just for the winter. I have AEM big brakes that I will be using for the summer. The dust shields are not painted but I bought them new from Honda as the old ones were rusted. At the same time I put in new wheels bearings into the spindles.
Yes I have H&R sport springs.

i like your airhorns:ph34r:

The OEM horn was dead so I wired up some air horns to use. lol!!
IMG_6357.jpg

IMG_6358.jpg

IMG_6895.jpg

IMG_6280.jpg


IMG_6287.jpg

IMG_6289.jpg


cleaned block with garden hose hooked up to the hot water tank.

c06dfdce.jpg


crankshaft before pic
IMG_5745.jpg

crankshaft after pic
9f3ba409.jpg

bearing marks before
ccba4d32.jpg

after polishing at home
04d2a3a1.jpg


17ebd9fb.jpg


5217b594.jpg


81b4ce36.jpg


39a80f7d.jpg


58a087f9.jpg


66442e05.jpg


f0ab6f36.jpg


the rods

259e4ab9.jpg


228404b3.jpg


135f5809.jpg


now i find there is one busted bolt i have to extract.

IMG_5923.jpg


febf4749.jpg


ed5d8352.jpg


86ac7982.jpg


4f73bc52.jpg


c06dfdce.jpg


39f29a44.jpg


de597a51.jpg


5108fef6.jpg


i drilled the bolt but still it will not budge

be7003da.jpg


922435ce.jpg


2fa45b37.jpg


0850918f.jpg


03af6368.jpg


1ec4ecaa.jpg


I sent out the cylinderhead to get rebuilt and once i got it back it was time for my disassembly and installation of a Competition cam, competition HD springs and titanium valve retainers.

is_00016.jpg


is_00017.jpg


is_00018.jpg


ports were ported and polished
is_00019.jpg

off it came
is_00020.jpg

is_00021.jpg

is_00022.jpg

is_00023.jpg

is_00024.jpg

is_00025.jpg

is_00026.jpg
 
new bearings

7058c0c4.jpg


758c8486.jpg


old bearings
15304b58.jpg

6dcd688c.jpg


cleaned oil pan going to get drilled and modified
7e664097.jpg

4e48e6c5.jpg

some JB weld for the oil return
IMG_6432.jpg


IMG_6433.jpg

temporary plug for the oil return so I can drive the car still as the turbo kit will be installed in spring
IMG_6434.jpg

IMG_6435.jpg


head installed on to the block with ARP head bolts. ARP is used for flywheel and pressure plate too.
IMG_6492.jpg

IMG_6491.jpg

IMG_6490.jpg


IMG_6489.jpg


new oil pump installed too
IMG_6488.jpg

plug so nothing gets inside
IMG_6487.jpg

IMG_6486.jpg

IMG_6484.jpg

IMG_6483.jpg

ARP grease
IMG_6482.jpg

IMG_6481.jpg

IMG_6480.jpg

IMG_6479.jpg

IMG_6478.jpg

IMG_6477.jpg


IMG_6590.jpg

IMG_6591.jpg

IMG_6592.jpg

IMG_6593.jpg

IMG_6594.jpg

IMG_6595.jpg

IMG_6596.jpg

IMG_6597.jpg

IMG_6598.jpg

IMG_6599.jpg

IMG_6600.jpg

IMG_6601.jpg

IMG_6602.jpg

IMG_6603.jpg

IMG_6604.jpg


IMG_6605.jpg

IMG_6606.jpg

IMG_6607.jpg

IMG_6608.jpg

IMG_6609.jpg
 
some more work before the powertrain swap.


47b8db37b3127ccec474add07a3400000056100QcOWzNuxcMQe3nww

disconnect both O2 sensors
47b8db37b3127ccec4740a493a6600000056100QcOWzNuxcMQe3nww

argh rust
47b8db37b3127ccec474aff8fb2d00000056100QcOWzNuxcMQe3nww


heat shield prevented even more rust on the nuts
47b8db37b3127ccec4744dcdfb6900000056100QcOWzNuxcMQe3nww


the two nuts that holds the downpipe was rusted and seized. I had to use a dremel and cut off disc


47b8db37b3127ccec4756bdadb2100000055110QcOWzNuxcMQe3nww


47b8db37b3127ccec475461e9b6b00000055130QcOWzNuxcMQe3nww


the two bolts that held the flanges together just snapped off when trying to remove them.
47b8db37b3127ccec475ee669b4700000055110QcOWzNuxcMQe3nww


to separate the catalytic from the downpipe looked labourous so I decided to cut the pipe instead.
47b8db37b3127ccec4753d1ddbcd00000055110QcOWzNuxcMQe3nww


general pic of the undersides
47b8db37b3127ccec4745e153a1000000056100QcOWzNuxcMQe3nww


new stainless headers installed
47b8db37b3127ccec4745a853a8200000056100QcOWzNuxcMQe3nww


47b8db37b3127ccec47580179b0100000055130QcOWzNuxcMQe3nww


free flow megan racing catalytic

47b8db37b3127ccec475d2731a7c00000055110QcOWzNuxcMQe3nww


some 12.9 grade socket caps bolts
47b8db37b3127ccec475740e1a5200000055110QcOWzNuxcMQe3nww


montreal winters sigh
47b8db37b3127ccec4742b8afb1d00000055110QcOWzNuxcMQe3nww


both O2 sensors are still good and going to be reused.

47b8db37b3127ccec47419da7a6400000055110QcOWzNuxcMQe3nww

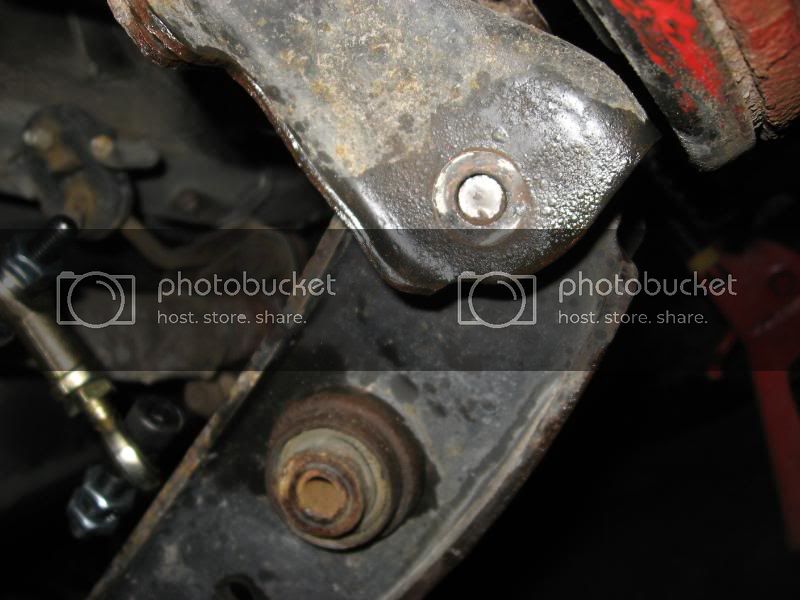
rusted out rear lower control arm
47b8db37b3127ccec475adf5db6d00000055110QcOWzNuxcMQe3nww


47b8db37b3127ccec4740c723a5e00000055110QcOWzNuxcMQe3nww


since i was underneath i notice the shifter bushing was loose and installed the prothane poly ones.
47b8db37b3127ccec47552b31afc00000056100QcOWzNuxcMQe3nww


47b8db37b3127ccec474a3c97a2a00000056100QcOWzNuxcMQe3nww


47b8db37b3127ccec4750ad91aba00000056100QcOWzNuxcMQe3nww

47b8db37b3127ccec474fcb23ae600000056100QcOWzNuxcMQe3nww


47b8db05b3127ccec464b293928900000046100QcOWzNuxcMQe3nww


47b8db05b3127ccec464cab013a600000046100QcOWzNuxcMQe3nww


another issue i had was the freaking mounting points for the hangers was no positioned good and the line hangs a bit. Got to figure something up to lift it higher so it doesn't drag.


47b8db05b3127ccec465d7fff20300000046100QcOWzNuxcMQe3nww

47b8db05b3127ccec46483ee534400000046100QcOWzNuxcMQe3nww

47b8db05b3127ccec465b994f25f00000046100QcOWzNuxcMQe3nww

47b8db05b3127ccec464336dd2af00000046100QcOWzNuxcMQe3nww

47b8db05b3127ccec4653aa6338400000046100QcOWzNuxcMQe3nww

47b8db05b3127ccec4657c66b25700000046100QcOWzNuxcMQe3nww

47b8db05b3127ccec464897cd2e300000046100QcOWzNuxcMQe3nww

47b8db05b3127ccec46554ccb2e900000046100QcOWzNuxcMQe3nww

need to weld a hanger underneath the floor so I can use this hanger on the exhaust line.
47b8db05b3127ccec46420cc929f00000046100QcOWzNuxcMQe3nww

I changed this worn bushing with the prothane one since I was under the car. LOL!!:wrench:
47b8db05b3127ccec465d8feb29d00000046100QcOWzNuxcMQe3nww

wanted to change this bushing and slap on the short shifter as well but seeing so much rust. I looked like it will take more than 30 minutes to do so I sprayed with it with some loose nut.
47b8db05b3127ccec46545daf26f00000046100QcOWzNuxcMQe3nww

47b8db05b3127ccec465c3a6736000000046100QcOWzNuxcMQe3nww

here is the bushing i needed to get to.
47b8db05b3127ccec464529f92f500000046100QcOWzNuxcMQe3nww

47b8db05b3127ccec46545f1737400000046100QcOWzNuxcMQe3nww

47b8db05b3127ccec4646f79d29500000046100QcOWzNuxcMQe3nww

47b8db05b3127ccec465735df2f300000046100QcOWzNuxcMQe3nww

I will need to get shorter bolts.
as long as it does the job.

47b8db05b3127ccec465980cb24f00000046100QcOWzNuxcMQe3nww
 
now some transmission goodies

diff bearings and all carbon synchros are in.
47b8dc08b3127cceb5903fb7d91500000026100QcOWzNuxcMR

47b8dc08b3127cceb5903fac583e00000026100QcOWzNuxcMR

47b8dc08b3127cceb5903d6158f200000026100QcOWzNuxcMR

47b8dc08b3127cceb59030b8998500000026100QcOWzNuxcMR

47b8dc08b3127cceb590310ad9af00000026100QcOWzNuxcMR

47b8dc08b3127cceb59031c4d96100000026100QcOWzNuxcMR

47b8dc08b3127cceb5903182d92700000026100QcOWzNuxcMR

47b8dc08b3127cceb59037d6584000000025110QcOWzNuxcMR

47b8dc08b3127cceb59037c2585400000026100QcOWzNuxcMR

47b8dc08b3127cceb590353d58aa00000026100QcOWzNuxcMR

47b8dc08b3127cceb5903593580400000025110QcOWzNuxcMR

47b8dc08b3127cceb5904b5458fc00000026100QcOWzNuxcMR

47b8dc08b3127cceb5904bd7d94f00000026100QcOWzNuxcMR

47b8dc08b3127cceb5904b83d91b00000026100QcOWzNuxcMR

OBX LSD

IMG_7267.jpg


IMG_7268.jpg


IMG_7269.jpg


IMG_7270.jpg


IMG_7272.jpg


IMG_7273.jpg


IMG_7274.jpg


IMG_7275.jpg


IMG_7276.jpg


IMG_7277.jpg


IMG_7278.jpg


IMG_7279.jpg


IMG_7280.jpg


IMG_7281.jpg


here is my rebuilt gearspeed B001 Si transmission where the LSD and synchros will be going into.


47b8dd10b3127cceb752cd54f9b300000026100QcOWzNuxcMR

47b8dd10b3127cceb752cd1978ce00000026100QcOWzNuxcMR

47b8dd10b3127cceb752cd08f9ef00000026100QcOWzNuxcMR

47b8dd10b3127cceb752c329f9c900000026100QcOWzNuxcMR

47b8dd10b3127cceb752c3f3f91300000026100QcOWzNuxcMR


47b8dd10b3127cceb752c3b4786400000026100QcOWzNuxcMR

47b8dd10b3127cceb752c060b91900000026100QcOWzNuxcMR

47b8dd10b3127cceb752c752788000000026100QcOWzNuxcMR

47b8dd10b3127cceb752c746789400000026100QcOWzNuxcMR

47b8dd10b3127cceb752c74c789e00000026100QcOWzNuxcMR

47b8dd10b3127cceb752c725f9c700000025110QcOWzNuxcMR
 
and to think you were just some noob... good work so far bro
 
amazing work thus far man keep it up. sounds like its going to be beastly
thumbs_up_icon.gif
 
Back
Top