Soldering is the best way to connect wires most of the time; but some circumstances call for crimping. Crimping is pretty straightforward, but it is so often done wrong that I think it warrants a tutorial. Even if you've been crimping for a long time, you can end up with 1 in 10 bad crimps. I find that unacceptable, so I developed a strategy for getting nearly all crimps perfect.
The most critical effect on the outcome is from your choice of tools and supplies. I've found that Channel Lock makes a damn near perfect crimping tool. It goes for $20 at Home Depot. I insist you use these over any of the more traditional styles of crimpers.
909 - THE CRIMPER™ - Crimping Tool
The next most important thing is to use non-insulated butt connectors. The crappy insulation on the more common butt connectors is often the cause of bad connections. It also fails to actually insulate the connection. Non-insulated butt connectors are rarely carried by any chain stores, but every community has a mom and pop electronics store. If you're serious about wiring, make it a habit of getting your supplies here instead of Radio Shack. Break out the yellow pages.
The final consideration is to use clear heat shrink tubing to insulate the connection. Since it's clear, you can see that it is centered over the butt connector and fully closed.
And of course that I shouldn't have to mention this but the wire, butt connectors, and shrink tubing need to be within the same diameter range. 18 gauge works best for most things we do to our cars. You'll want 22-16 non-insulated butt connectors and 3/8th diameter clear shrink tubing.
Tools:
https://hondaswap.com/attachment.php?attachmentid=296&stc=1&d=1153456554
Channel Lock 909 Crimpers from Home Depot
Heat Gun from Harbor Freight or similar
Quick Strippers from Harbor Freight or similar
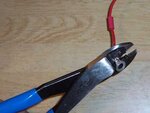
wire cutters (anything is fine, but I got this sweet little cutter from the Snap On guy (not made by Snap On))
Supplies:
https://hondaswap.com/attachment.php?attachmentid=302&stc=1&d=1153456554
18 gauge wire depending on the job. 10 gauge for the ignition harness, 16 or 14 for lighting or fuel/ignition wiring.
22-16, 16-14, or 12-10 gauge non-insulated butt connectors depending on the job
3/8th clear heat shrink tubing depending on the job
ring terminals 18 gauge and various loop sizes
non-insulated female quick disconnects (if you will be connecting to aftermarket switches, relays, or tapping off the fusebox outputs on mid 90's Civics and Integras)
Steps:
https://hondaswap.com/attachment.php?attachmentid=301&stc=1&d=1153456554
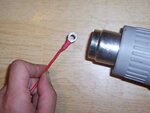
Strip back each wire about half the length of the butt connector. It has to be short enough that some of the insulation gets pinned in the butt connector. Trim it if necessary.
https://hondaswap.com/attachment.php?attachmentid=295&stc=1&d=1153456554
Cut an inch of heat shrink and slide it over one of the wires.
https://hondaswap.com/attachment.php?attachmentid=303&stc=1&d=1153456554
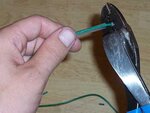
Shove the stripped end of the wire into the crimp and crimp it down. Put the ridge on the crimpers on the seam of the butt connector.
"There should be a visible bell/mouth at the end of the crimp, and no material at the edge of the crimp connector that is actually crimped into the wire. If the edge of the connector is crimped, you don't have a complete crimp indentation in your connector, and strength is compromised.
The same goes for the trimmed end of the wire. There should be enough wire inside the crimp connector so that the entire crimp indentation rests within the length of the stripped wire. If the wire ends before the end of the crimp indent, you don't have full contact, and the connection is physically weaker than it should be. This can cause the wires to pull out. (Calesta)"
https://hondaswap.com/attachment.php?attachmentid=297&stc=1&d=1153456554
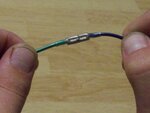
Crimp the other wire. Give the wire a good tug to make sure the crimp is tight.
https://hondaswap.com/attachment.php?attachmentid=305&stc=1&d=1153456554
Center the heat shrink over the butt connector. It's critical that the butt connector and all the exposed wire is more than covered by the heat shrink. Now set the heat gun on low, let it warm up for a few seconds, heat the end of the tubing until it grabs, then get your hands out of the way and blow it down on all sides. Be mindful of where you blow that hot air. It will melt carpet, split loom, and cause electric tape to unstick.
https://hondaswap.com/attachment.php?attachmentid=304&stc=1&d=1153456554
The finished product.
https://hondaswap.com/attachment.php?attachmentid=298&stc=1&d=1153456554
https://hondaswap.com/attachment.php?attachmentid=300&stc=1&d=1153456554
Crimping on ring terminals or female quick disconnects etc is pretty self explanitory at this point. You can get these non-insulated as well. For grounds, heat shrink tubing is pretty much just for looks. I usually use the black stuff. For female quick disconnects, have the heat shrink run all the way to 1mm away from the tip.
Photographers: Randy (nine years old), and Michelle.
The most critical effect on the outcome is from your choice of tools and supplies. I've found that Channel Lock makes a damn near perfect crimping tool. It goes for $20 at Home Depot. I insist you use these over any of the more traditional styles of crimpers.
909 - THE CRIMPER™ - Crimping Tool
The next most important thing is to use non-insulated butt connectors. The crappy insulation on the more common butt connectors is often the cause of bad connections. It also fails to actually insulate the connection. Non-insulated butt connectors are rarely carried by any chain stores, but every community has a mom and pop electronics store. If you're serious about wiring, make it a habit of getting your supplies here instead of Radio Shack. Break out the yellow pages.
The final consideration is to use clear heat shrink tubing to insulate the connection. Since it's clear, you can see that it is centered over the butt connector and fully closed.
And of course that I shouldn't have to mention this but the wire, butt connectors, and shrink tubing need to be within the same diameter range. 18 gauge works best for most things we do to our cars. You'll want 22-16 non-insulated butt connectors and 3/8th diameter clear shrink tubing.
Tools:
https://hondaswap.com/attachment.php?attachmentid=296&stc=1&d=1153456554
Channel Lock 909 Crimpers from Home Depot
Heat Gun from Harbor Freight or similar
Quick Strippers from Harbor Freight or similar
wire cutters (anything is fine, but I got this sweet little cutter from the Snap On guy (not made by Snap On))
Supplies:
https://hondaswap.com/attachment.php?attachmentid=302&stc=1&d=1153456554
18 gauge wire depending on the job. 10 gauge for the ignition harness, 16 or 14 for lighting or fuel/ignition wiring.
22-16, 16-14, or 12-10 gauge non-insulated butt connectors depending on the job
3/8th clear heat shrink tubing depending on the job
ring terminals 18 gauge and various loop sizes
non-insulated female quick disconnects (if you will be connecting to aftermarket switches, relays, or tapping off the fusebox outputs on mid 90's Civics and Integras)
Steps:
https://hondaswap.com/attachment.php?attachmentid=301&stc=1&d=1153456554
Strip back each wire about half the length of the butt connector. It has to be short enough that some of the insulation gets pinned in the butt connector. Trim it if necessary.
https://hondaswap.com/attachment.php?attachmentid=295&stc=1&d=1153456554
Cut an inch of heat shrink and slide it over one of the wires.
https://hondaswap.com/attachment.php?attachmentid=303&stc=1&d=1153456554
Shove the stripped end of the wire into the crimp and crimp it down. Put the ridge on the crimpers on the seam of the butt connector.
"There should be a visible bell/mouth at the end of the crimp, and no material at the edge of the crimp connector that is actually crimped into the wire. If the edge of the connector is crimped, you don't have a complete crimp indentation in your connector, and strength is compromised.
The same goes for the trimmed end of the wire. There should be enough wire inside the crimp connector so that the entire crimp indentation rests within the length of the stripped wire. If the wire ends before the end of the crimp indent, you don't have full contact, and the connection is physically weaker than it should be. This can cause the wires to pull out. (Calesta)"
https://hondaswap.com/attachment.php?attachmentid=297&stc=1&d=1153456554
Crimp the other wire. Give the wire a good tug to make sure the crimp is tight.
https://hondaswap.com/attachment.php?attachmentid=305&stc=1&d=1153456554
Center the heat shrink over the butt connector. It's critical that the butt connector and all the exposed wire is more than covered by the heat shrink. Now set the heat gun on low, let it warm up for a few seconds, heat the end of the tubing until it grabs, then get your hands out of the way and blow it down on all sides. Be mindful of where you blow that hot air. It will melt carpet, split loom, and cause electric tape to unstick.
https://hondaswap.com/attachment.php?attachmentid=304&stc=1&d=1153456554
The finished product.
https://hondaswap.com/attachment.php?attachmentid=298&stc=1&d=1153456554
https://hondaswap.com/attachment.php?attachmentid=300&stc=1&d=1153456554
Crimping on ring terminals or female quick disconnects etc is pretty self explanitory at this point. You can get these non-insulated as well. For grounds, heat shrink tubing is pretty much just for looks. I usually use the black stuff. For female quick disconnects, have the heat shrink run all the way to 1mm away from the tip.
Photographers: Randy (nine years old), and Michelle.
Attachments
Last edited:

") Wish other's would too "hint".
Wish other's would too "hint".